All of my pages are sized 12x12. When I print them out myself, the only place that I know of that does 12x12 is Costco. It costs $3 per page at my local Costco stores. It is a much better investment to create a photobook with the pages from Shutterfly.com, Mixbook.com or any of those types. The downside to printing books, even though it is much cheaper than buying an ablum and printing each page, is that you can only have up to about 100 pages and once the book is printed, you won't be able to add or take away from it. It is something to think about.
Let's get started!!
First things first - you need to download some files for digital scrapbooking. My favorite sites are listed on my sidebar. I would recommend visiting Summertime Designs at http://summertimedesigns.blogspot.com/. Everything that she creates is free and ADORABLE. I have gotten most of my favorite things from her. She is so talented. Download the files from the "download" buttons. Papers are the digital form of physical papers. Elements (or embellishments) are all of the fun things like ribbons, buttons, bows, animals, and alphabet letters. Make sure not to miss those!
Make sure you save these files to your computer and know where you have saved them so you can retrieve them. Open the folders and if you are using an older version of Windows, you will need to export all of the files. Finish that and then you will be able to cut/copy the files wherever you would like. I organized mine in a big folder with papers in one folder, embellishments, alphabet letters, and so forth.
Now let's get started in Photoshop. Open up Photoshop and drag and drop in one of the papers and an embellishment of some sort. I will use some Hawaiian paper (gotta love Hawaii!) and a picture frame embellishment. I dragged and dropped the picture frame embellishment onto the paper, which is the background here.
 You may ask how I got the first layer onto my background. Look at the picture below and notice that when I have selected the picture frame layer, you will see Layer 0 in the Layers column.
 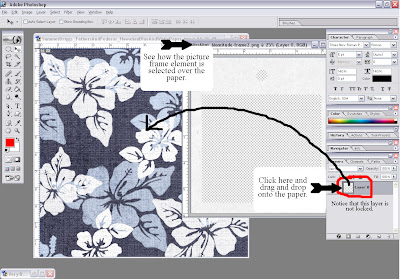 You click on that little picture of the picture frame layer in the layers column. Drag and drop this onto the background. Then you will be able to move it around as you please - as long as you have the Layer selected in the layers column. Make sense? I hope you like my drawings. :)
You will do this same thing for everything that you would like to put on your page, thus creating multiple layers. You may edit or delete the layers at any time by simply selecting the layer you would like to change and then doing what you like with it. To delete it, there is a little trashcan at the bottom right corner of the layers column.
Go ahead and mess around! Become familiar with Photoshop and the layers.
No comments:
Post a Comment